Interactive Image Creator


Create clickable overlays in custom images by adding polygons in iiCreator.

  1. Click Add Polygons icon in vertical toolbar
  2. Mouse click on the custom image and start drawing the polygon
  3. Right click to end drawing
  4. For modifying the shape of the polygon, you can:
    • Click Select / Drag and object icon in horizontal toolbar
    • Select polygon on the map
    • Select a dot on the stroke to split the line segment
    • Modifying the shape of the polygon by dragging the stroke
      *Right click for restoring to previous step
    • Copy the polygon by clicking "duplicated" button in the List of Polygons on the right side of the editor.
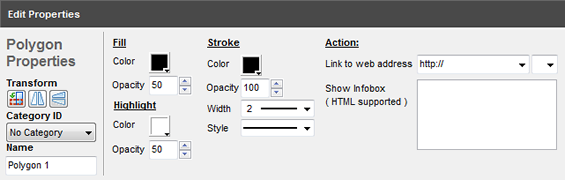
  5. Edit the polygon in Polygon Properties panel at the bottom of iiCreator editor
PropertiesDescriptions
NameName of the polygon
TransformTransform position of the polygon by:
- rotate-in-iicreator: rotating 90 degree
- flip hotizontally in iiCreator: flipping horizontally
- flip vertically in iicreator: flipping vertically
Category IDAssign the polygon to a category
FillColor: color of filled area
Opacity: opacity of the filled area
StrokeColor: color of stroke
Opacity: opacity of stroke
Width: thickness of stroke
Style: style of stroke
(e.g. solid, dot, dash)
HighlightColor: color of highlighted polygons
Opacity: opacity of highlighted polygons
Link to web address- Insert link to the path
- Select destination to open the hyperlink:
New Window / Same Frame / Parent Frame / Root Frame
Show Infobox- Insert content (e.g. text, image, video, table, etc.) to the polygon when mouseover it
- HTML code is supported

If you are not familiar with coding, you could add infobox content using Rich Text Editor.
  • Select "Rich Text Editor"
  • Mouse click in the space below, and then an "Infobox Wizard" will be popped up
  • Select an infobox layout
  • Upload an image and edit the size of it
  • Enter and edit text content using tools in the menu bar
  • Click "OK" to complete the editing

[ Back ]